Layout Tricks: レイアウトをマージする
The articles showed you how to use the <include /> tag in XML layouts, toreuse and share your layout code.
<merge />タグは、ビュー ツリーのレベル数を減らすことによって Android レイアウトを最適化する目的で作成されました。 このタグが解決する問題を理解するには、例を見るのが簡単です。 次のXMLレイアウトは、画像を表示し、その上にタイトルを表示するレイアウトを宣言しています。 ImageView の上に TextView を重ねるために FrameLayout が使用されています:
<FrameLayout xmlns:android="http://schemas.android.com/apk/res/android" android:layout_width="fill_parent" android:layout_height="fill_parent"> <ImageView android:layout_width="fill_parent" android:layout_height="fill_parent" android:scaleType="center" android:src="@drawable/golden_gate" /> <TextView android:layout_width="wrap_content" android:layout_height="wrap_content" android:layout_marginBottom="20dip" android:layout_gravity="center_horizontal|bottom" android:padding="12dip" android:background="#AA000000" android:textColor="#ffffffff" android:text="Golden Gate" /></FrameLayout>
このレイアウトはきれいに表示され、何も問題はないようです:

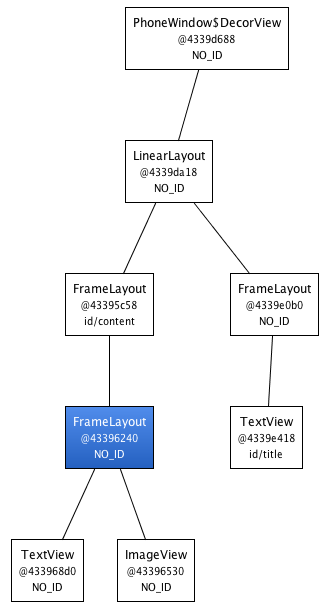
HierarchyViewer で結果を検査すると、さらに興味深いことが起こります。 結果のツリーをよく見ると、XML ファイルで定義されている FrameLayout (下の青で強調表示) は、別の FrameLayout の唯一の子であることに気づきます:

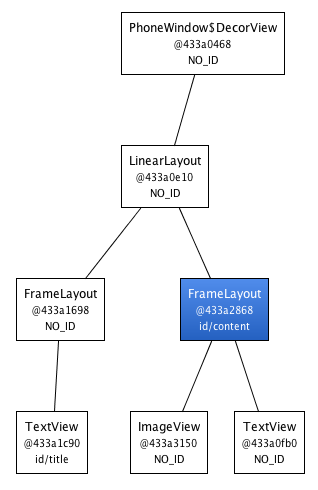
この FrameLayout には fill_parent制約を使用するという理由で親と同じ寸法があり、背景、追加のパディング、重力は定義されていないので、まったく無意味な存在になっています。 意味もなくUIが複雑になっただけです。 しかし、このFrameLayoutを取り除くにはどうしたらよいのでしょうか。 結局のところ、XML ドキュメントにはルート タグが必要であり、XML レイアウトのタグは常にビュー インスタンスを表します。 LayoutInflater がこのタグに遭遇すると、タグをスキップして <merge /> の子を <merge /> の親に追加します。 混乱した? この新しいバージョンでは、TextView と ImageView の両方がトップレベル FrameLayout に直接追加されることになります。

当然ながら、アクティビティのコンテンツ ビューの親は常に FrameLayout なので、<merge /> を使用すると、この場合に機能します。 例えば、レイアウトがルートタグとしてLinearLayoutを使用している場合、このトリックを適用することはできません。 しかし、<merge />は他の状況でも役に立ちます。 たとえば、<include />タグと組み合わせると、完璧に機能する。 また、カスタムコンポジットビューを作成する場合にも、<merge/>を使用することができます。 このタグを使用して、カスタマイズ可能なラベルを持つ2つのボタンを表示するOkCancelBarという新しいビューを作成する方法を説明します。 この例の完全なソースコードもダウンロードできます。
<merge xmlns:android="http://schemas.android.com/apk/res/android" xmlns:okCancelBar="http://schemas.android.com/apk/res/com.example.android.merge"> <ImageView android:layout_width="fill_parent" android:layout_height="fill_parent" android:scaleType="center" android:src="@drawable/golden_gate" /> <com.example.android.merge.OkCancelBar android:layout_width="fill_parent" android:layout_height="wrap_content" android:layout_gravity="bottom" android:paddingTop="8dip" android:gravity="center_horizontal" android:background="#AA000000" okCancelBar:okLabel="Save" okCancelBar:cancelLabel="Don't save" /></merge>
この新しいレイアウトは、デバイス上で次の結果を生成します。

OkCancelBar のソースコードは非常に単純です。 次のスニペットに示すように、XMLlayout R.layout.okcancelbar は OkCancelBar を親として展開されます:
public class OkCancelBar extends LinearLayout { public OkCancelBar(Context context, AttributeSet attrs) { super(context, attrs); setOrientation(HORIZONTAL); setGravity(Gravity.CENTER); setWeightSum(1.0f); LayoutInflater.from(context).inflate(R.layout.okcancelbar, this, true); TypedArray array = context.obtainStyledAttributes(attrs, R.styleable.OkCancelBar, 0, 0); String text = array.getString(R.styleable.OkCancelBar_okLabel); if (text == null) text = "Ok"; ((Button) findViewById(R.id.okcancelbar_ok)).setText(text); text = array.getString(R.styleable.OkCancelBar_cancelLabel); if (text == null) text = "Cancel"; ((Button) findViewById(R.id.okcancelbar_cancel)).setText(text); array.recycle(); }}
2 つのボタンは次の XML レイアウトで定義されています。 ご覧のように、<merge /> タグを使用して、2 つのボタンを OkCancelBar に直接追加しています。 各ボタンは、維持しやすくするために同じ外部 XMLlayout ファイルから含まれており、単に ID をオーバーライドするだけです。
-
<merge />は XML レイアウトのルート タグとしてのみ使用可能 <merge />で始まるレイアウトを展開する場合、親ViewGroupを指定し、attachToRootをtrueに設定しなければなりません (inflate(int, android.view.ViewGroup, boolean)のドキュメントを参照)
。
Leave a Reply